So you’ve heard of the eXemplary BlackBox and Combined Arms mods for the first StarDrive, and are in need of some help? Fear not, for our friend Trifler created this starter guide to help you get on your feet, featuring the Humans!
Before we get started, I want to mention that these mods are no longer installed over the vanilla game from Steam or elsewhere. BlackBox and Combined Arms are now released with a standalone installer called “StarDrive Plus,” which includes the base game with the developer’s permission. Thus, the Steam version does not even need to be installed. If you don’t own the game and have fun with it, I would still encourage you to buy the game on Steam to support the developer’s decision to allow this, even though you may never install it. StarDrive Plus includes a self-patcher so, once installed, further updates are done from within the game.
The BlackBox and Combined Arms teams have made a lot of balance changes since my last guide for the Opteris. So many that almost none of my designs in any of the previous guides (which are still up if you want to see some of the changes) work properly anymore.
To Install
The BlackBox team manages the installer. Click on the link and then scroll down to the ReadMe. There’s a paragraph under “StarDrive BlackBox”, and immediately underneath that, “Downloads”. As long as they keep this page updated, it will take you to the latest version. Click on the link for the “Current Major Release”. Read the installation instructions and then download the .MSI file. If you missed it, it does not go in your Steam folder.
Next, you need the Combined Arms mod. I’ve provided a link to their Releases page to download it.
Run the BlackBox installer. Make a note of where it puts your StarDrive Plus folder. Then extract the Combined Arms mod to your StarDrivePlusMods folder. Once it finishes extracting, run StarDrive BlackBox. Click on Options to set your resolution and other settings. Then click on Mods, then click on Combined Arms, and click on Load. At that point you should be good to go.
There are old videos on YouTube showing how to install the mod into your Steam folder. These are obsolete and won’t work anymore. Unless you see one that says it’s for BlackBox 1.41 or newer.
This guide was written using Black Box version Mars 1.41.14757 and Combined Arms version 8.1K (some in 8.1Q).
Major design-related changes that I noticed since my last guide:
- Nuclear Reactors were buffed, but Fusion Reactors were left unchanged.
- Ordnance was re-balanced, possibly across the board. Where before a 1×1 Small Ordnance held 1/5th as much as a 2×2 Ordnance Storage, now a 1×1 only holds 1/8th. This continues with the 3×3 Large Ordnance Storage. So, the incentive to use larger Ordnance Containers is extremely high.
- Armored Ordnance containers no longer exist.
- Many weapons have had the amount of ordnance they use adjusted as well.
- Shields were completely re-balanced, with new shield generators replacing the old ones, and an entirely new type, called Deflector Screens.
- Players no longer start with Basic Shields.
- Cargo Containers were re-balanced (in 8.1Q). The Large Cargo Hold is great now (it used to be useless), although I think they overdid it because now there’s a massive difference between the Medium Cargo Hold and the Large Cargo Hold, but only a tiny discrepancy from there to the Container Deck.
- Research Stations were added along with research locations for building them in the galaxy.
The technologies and the order of research in this guide were chosen carefully for certain synergies and time constraints. Since this guide is for the Humans, it primarily focuses on designs that use ballistic weapons with a couple of choices from the missile branch.
Before Unpausing
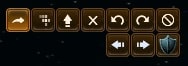
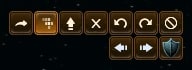
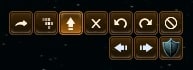
Before unpausing the game, configure your automation settings using the small “AI” button, just to the left of the minimap (lower-right corner of the main screen).
- I recommend turning on Autoexplore. This will allow the game to manage all of your scouts.
- You can turn on Auto Pick Colony Ship, but leave Autocolonize off.
- I recommend leaving Auto Pick Freighter off. I haven’t found it to be good at actually choosing the best freighter design. This does mean you’ll need to manually change this when new freighters become available.
- Leave Automatic Trade off for now, but we’ll turn it on soon. This option not only automates control of the freighters, but it also builds them automatically.
Here are some other things to start out:
- I suggest lowering the taxes to 15% to increase research and production.
- I usually set the home world governor to “Core” so that it will handle adjusting the Food, Production, and Research bars for me, as well as most production queue tasks.
- Queue up 2-4 troops or check the box to “Auto Build Garrison”. You will need to send them to planets with anomalies to explore them. Be aware that some anomalies spawn enemies, either on the surface or, in some cases, in orbit.
Regarding Colonies
- You can use the Planet Reconnaissance button to the left of the minimap. “L” is the hotkey. This gives you a list of all of the planets you know about. I like to check the Hide Uninhabitable and Hide Unowned boxes, then sort by Fertility. This list will populate automatically as your scouts explore.
- I set all of my colonies to Trade Post to start with. I want them to adjust their own sliders and handle imports, but I don’t want them to auto-build buildings.
- Building production buildings on every colony is a waste of money. These buildings cost maintenance, so I don’t want them on any colony with a low Richness value. At the start of the game, I only want them on the home world, which is the only place actively building ships. Later, I pick colonies that can make use of production buildings efficiently and have them export production.
- Science buildings such as Research Labs generate most of their research from population. They do produce some research regardless of population though, so if or when you have more income to work with, feel free to build more of them.
- I do build economic buildings everywhere (unless there’s no space), since they don’t have a maintenance cost.
- Biospheres, once researched, rack up a great deal of maintenance if left to auto-build. Each one has a permanent maintenance cost. To use them efficiently:
- If a colony isn’t at, or near, its maximum population then a biosphere isn’t going to provide any benefit, unless you don’t have any free tiles to put an important building on. Wait until colonies fill up before building biospheres.
- Notice that the increase in maximum population that a biosphere provides is different, depending on how suitable the planet’s biome is for your people. I prefer not to build biospheres on planets where each biosphere provides less than 0.20 to the maximum population. In some cases, I’ll use them on 0.15 planets. Anything lower than that and I never build them there. Ever.
The “K” key brings up a list of all your ships, so this is another useful hotkey.
Prototype Cruiser
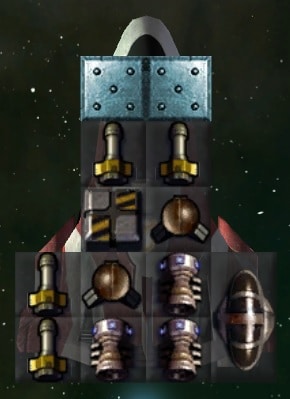
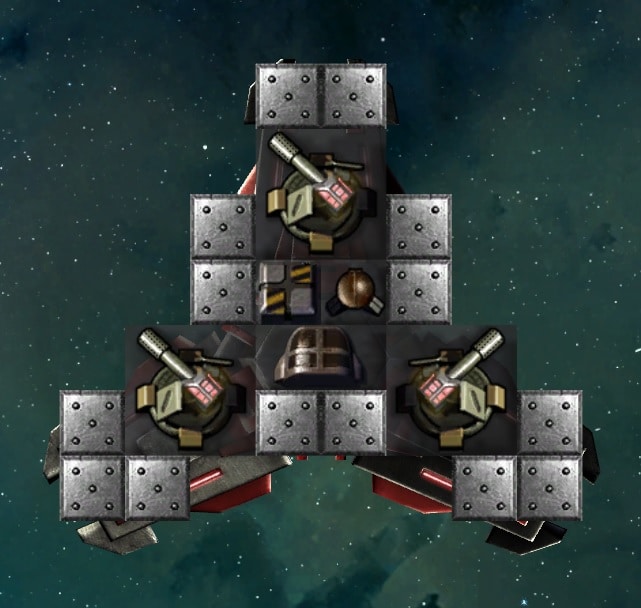
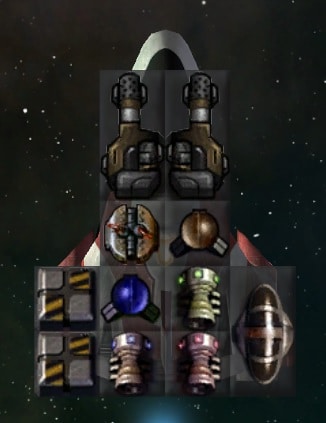
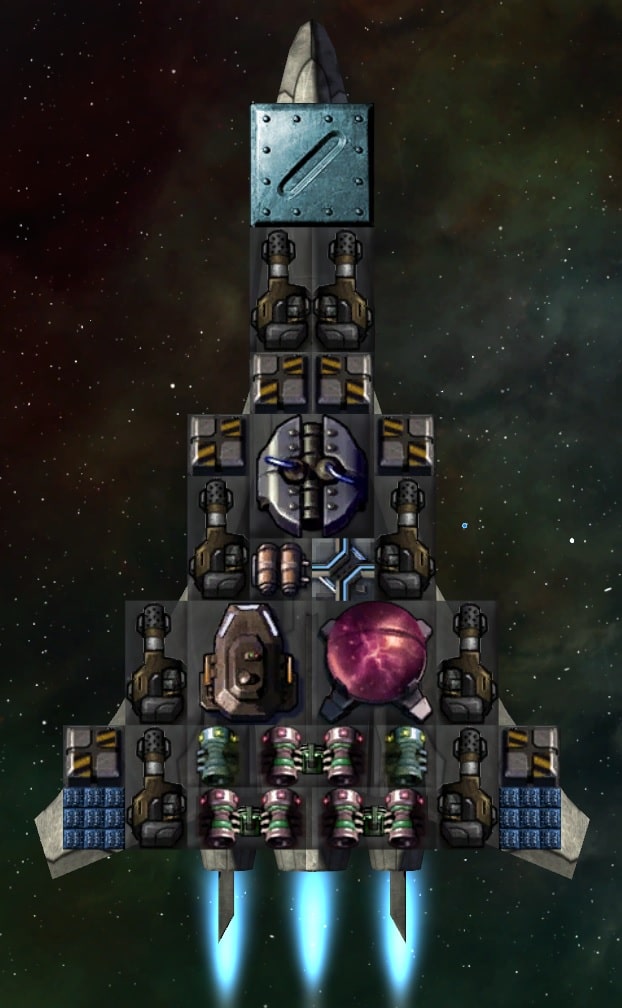
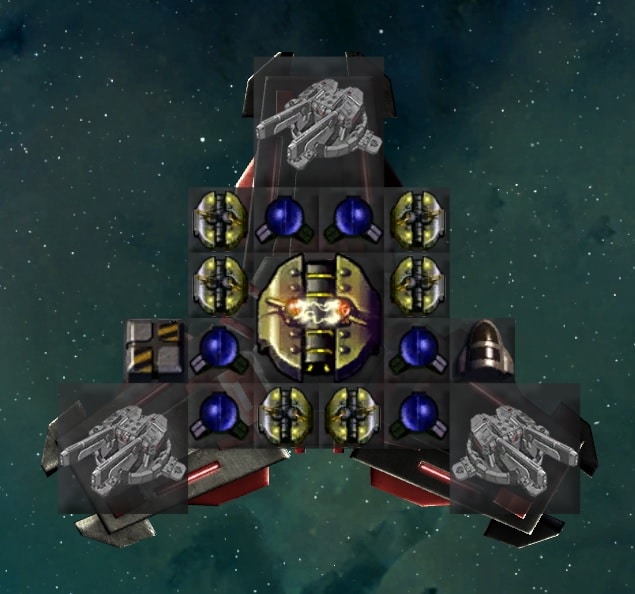
Humans start with a prototype cruiser. It’s unique in that it doesn’t cost any maintenance, so take care of it. This ship has five shield generators, armor, a variety of different projectile weapons, most of which are defensive in nature, and four fighter bays. It’s not good in close combat. Unfortunately, it’s only powered by nuclear reactors, so they take up a great deal of the available space. There’s no way to edit prototype ships, however the four fighters can be upgraded by creating better fighter designs.
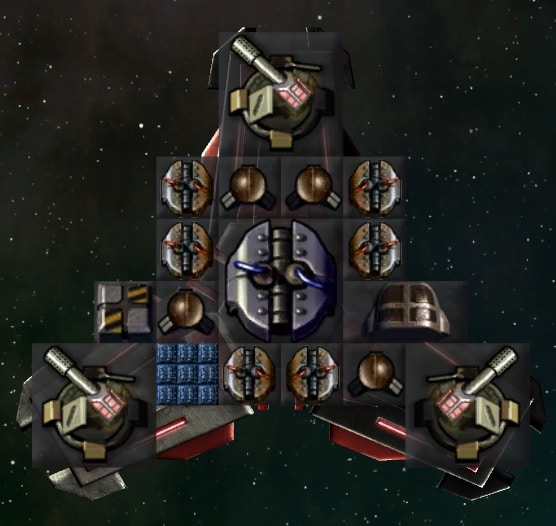
You can view the ship components yourself in the game by selecting the ship and pressing the Tab key.

You can see there are actually separate circles for each shield generator, shown in green here. Different shield types have a different color.
Working Our Way Up
This guide will take you through steps to get to the point where your people can build more of these cruisers, although they won’t get free maintenance. We’ll cover some upgrades and some changes as well. There’s also the Orbital Defenses Addendum (2023) that covers defense platforms in much more detail.
1) Right off the bat, I like to create this more heavily armed Shuttle V 1:

These are only effective when used in large groups. It can’t take hits, but it inflicts more damage than the starting design, and it doesn’t require any research. Once it’s created, your prototype cruiser will automatically use this design instead. The Fighter Bays automatically launch the fighter design with the highest Strength Rating that you are currently capable of producing.
When attacking, put all of your fighters into a control group. Be sure to have your fleet warp to a location near the enemy, but out of sensor range, so they aren’t all spread out when you order the attack. Keep moving closer, trying to maintain group cohesion. I don’t recommend right-clicking on an enemy until either you’re really close or they jump towards you. Once the enemy is in range, have your ships focus fire, especially when fighting Remnants, at this stage of the game. Use pause, so you can right-click on targets.
Sometimes, with the Remnants especially, the target you’re focusing on will reverse at full speed through the middle of their forces, in an attempt to funnel your ships between theirs, giving them free shots at the sides and rear of your ships. When this happens (and it will get easier to spot once you’ve seen it a few times), pause the game and switch targets. This will become less and less of an issue as technology progresses.
Don’t fight to the last fighter. They’re only effective in large numbers. Once roughly half of your fighters have been destroyed, the remainder won’t be nearly as effective, and any you bring home are fighters you don’t have to spend time rebuilding.
When defending, your ships will automatically respond to enemy incursions based on their sensor range. I need to test this more, but I believe that if they’re in a fleet, then if one ship in the fleet has a sensor module, then they will all respond to what it detects. If they are not in a fleet, then they will respond individually. If I’m correct about that, then early on you can include a scout in your fleet. Later, you can have a larger ship design that has a sensor module.
If it helps, you can slow time to 0.5x while watching combat, especially when watching to learn how ships use their weapons.
Formations

The game does have a formation editor under the Fleets button, where you can specify which ship designs you want in what positions. It works great… until anything changes. As soon as you start building another design, it breaks. I soon found using different control groups for the front line and the support ships far easier.
That being said, if you start using a lot of different designs with completely dissimilar speeds, then the control groups could become problematic, as they don’t tell ships to travel at the speed of the slowest ship in the control group.
You place ships by hand, so it’s impossible to get a perfectly straight row. Hold down Shift to place multiple units of the selected design.
The team has added an “Auto-Arrange” button. First, select the ships you want, and add them to a control group. Then open the formation editor and click on Auto-Arrange. This still only works until you add another ship to the fleet, but it’s quick to do. Unfortunately, I really dislike the formation it creates, so I still don’t use it. I also don’t think it’s smart enough to put artillery ships in the back, which is crucial, but honestly I haven’t tested this much, since I already disliked the formation. I’m told they’re still working on this feature, and I’m willing to try it again in the future.
2) The first research I recommend is Scientific Foundations. When it’s finished, the homeworld should build a Research Lab automatically. This will increase your research rate and it won’t take long to overtake the time spent researching this. I don’t recommend building Research Labs on colonies with small populations. It’s simply too expensive.
Going further and researching Advanced Education will provide an additional, but smaller increase to the research rate. I’ll leave it up to you whether to research it now or later.
3) Research Polymer Armor. It’s very quick and it’s needed for the next design.
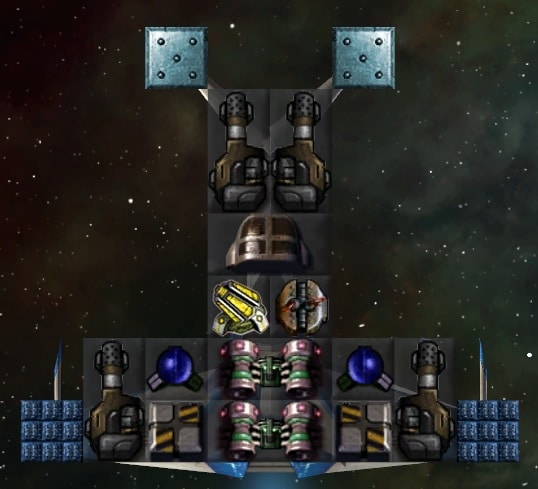
4) The next research I select is Fighter Hulls I, which unlocks not only the Lightning hull, but also the Dual Cockpit, which increases the accuracy and repair rate. It’s also useful on corvettes later. Using two single cockpits does not increase accuracy, so the dual is the way to go. Once this is researched, you can create this Lightning V 1P (V for Vulcan, P for Plasteel, and 1 for Nuclear power):
Use the left or right arrow key to rotate the Dual Cockpit.
This arrangement was necessary to get power to reach everything.
Set them to Face Forward, Short Range
Set the Repair Options to Reckless
The Lightning as a whole leaves the Shuttle in the dust. Although this design has the same number of weapons, the dual cockpit increases their accuracy and the plasteel gives a group of these at least some protection. The third engine allows it to do it without any loss in speed.
5) With the Lightning in hand, Subspace Projectors, under the Logistics tab, is useful to improve the transport ships, unlock the Light Defense Platform, and get closer to the Advanced Colony Module.
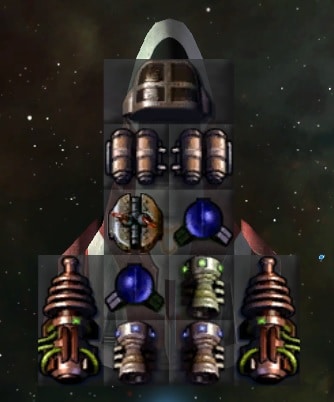
The original Small Transport is terrible. The 2×2 Medium Cargo Hold is much more efficient than the 1x1s. It looks like the mod creators added my design from the previous guide as the Small Transport Mk2, so that was fun to see. In the vanilla game, all of the included transport designs use a 2×2 nuclear reactor, so there was a lot of savings to be had by removing that. Since then, I found a way to refine the design further. I call this the Small Transport A:
The solar panels allow removing one of the nuclear reactors, which lowers the maintenance cost slightly. Moving the cockpit down allowed for the addition of a fourth 2×2 cargo module.
Optionally, you can change the two 1×1 cargo modules to 1×1 Structure, which have a mass of 1, in order to maintain the same speed as the Small Transport Mk2. It’s hard to say whether it’s worth the trade-off or not.
Set them to Avoid Enemies and the Repair Options to Civilian
Open the AI menu, select the new freighter and turn on Automatic Trade so that the AI will use it.
6) We have the Platform Base hull, so now research Steel Armor for our first defense platform, which I call the SDP K 1S (SDP for Small Defense Platform, K for Kinetic Cannon, S for Steel Armor):
Unfortunately, there are some holes in the armor that shots can get through, but these are incredibly cheap to maintain compared with one with Basic Shielding tech. We’ll make shielded versions later.
The Dual Cockpit allows the platform to fire at two targets at once, improves the accuracy, and the repair rate.
If this is your first SDP, turn off the Toggle Symmetry button in the bottom right. You adjust the firing arcs by left clicking and holding down the mouse button on a turret, then move the mouse left or right. Release the mouse button when it’s at the desired angle. The angle of the center line is displayed in the middle of the turret. The text can be quite small.
Set the top turret to 0 degrees, the right turret to 120, and the left turret to 240. This will make them all equidistant, and together the will cover a full 360.
Now, every platform and station built in the game requires a new construction ship, so you’ll build a lot of them over the course of a game. I designed a somewhat cheaper one. It’s up to you if you think it’s worth using. I call this the Terran Constructor A:

7) This is about when I recommend researching Corvette Construction, and I build some Hunters armed with Kinetic Turrets, (which you start the game with). At the moment, the game currently lists two different weapons with this name. Be sure to select the first one, with the higher Speed stat.
These Hunter K 1S corvettes are a valuable addition:

Face Forward, Max Range
(2 Small Warp Engines, 2 Small Combat Engines)
To change the arcs of the left and right turrets, click and hold on a turret, the drag the mouse left or right. In this case, turning on symmetry can be helpful, because it changes the arcs of both turrets simultaneously to ensure they match. I recommend adjusting them so that they just barely overlap, and then go one notch further, resulting in 330 on the left and 30 on the right.
Adding even just a few of these to your fleet can have a major impact at this stage. Position these behind the fighters. The fighters will screen while these provide supporting fire.
I recommend setting the fighters to control group 1, and these corvettes to control group 2. This makes it easier to keep the fighters from getting too far ahead. If the fighters all die before the corvettes get into range, then they’re no help at all. That’s a big “Fail” when that happens, so keep them together to avoid that.
I try to avoid colonizing planets that can’t produce any food, but occasionally there’s one that has something really valuable on it. For these, researching Farming Foundations can be very useful.
8) We can rely on these units for a time while researching shields. Shields increase maintenance costs drastically, and Basic Shields don’t cost any less than Energy Shields, so research both Basic Shielding and Energy Shielding before continuing.
Let’s add a 2×2 Energy Shield to the Kinetic Cannon support corvettes. While placing the shield, pay attention to the shield circle. The shield can’t protect anything outside of the circle, so positioning is important.
The Hunter K ES 1P (ES = Energy Shield technology):

Face Forward, Max Range
Now that it has a 2×2 shield generator, I swapped the steel armor with plasteel.
9) I recommend researching Magnetic Artillery over Missile Theory at this point. This provides the Hyper Velocity Vulcan Cannon and the Railgun. If I was playing as a faction with a penalty to their accuracy, that would be a different story, since missiles are guided. This is also the first step in our journey towards the Railgun Turret that we’ll need to reproduce the prototype cruiser.
The Hyper Velocity Vulcan is nice for fighters because the projectiles are fast. Enemies can’t easily reverse and move out of range before they get hit. However, this particular weapon requires both ordnance and power.
Each HV Vulcan fires in 10-round bursts, using 5 Power per round, requiring the ability to store 50 Power per HV Vulcan. In the following Lightning HV FS 1 design (HV = High Velocity, FS = Fighter Shield), the two 1×1 nuclear reactors aren’t capable of storing the 100 Power needed for both HV Vulcans to fire a full volley. So, a 1×1 power capacitor is needed to avoid losing substantial DPS. Once we research fusion reactors, this will no longer be necessary, since they have more built-in power storage.
This fighter uses 1 Small Warp Engine, 1 Small Combat Engine, and 1 regular Small Engine
Set them to Attack Runs or Short Range, as you prefer
The shield on this fighter doesn’t actually offer any more protection than the Plasteel did against attacks from the front, but shields protect the fighter against attacks from all sides.
There’s a case to be made for researching Missile Theory at this stage, either instead of Magnetic Artillery, or in addition to it. On paper, and if used right, missiles add a lot of firepower. The mod developers have included assorted designs that use them. However, the guided rockets (which by being guided, are by definition actually mini-“missiles”) and missiles unlocked by this tech are slow and fairly easy to shoot down. Thus, the actual damage is much lower, and can be even be zero, depending on the enemy’s speed and how well your missile spam is able to overwhelm the enemy’s point defenses (PD). In addition, the mod developers have included a number of designs that use these weapons, but there’s nothing I would recommend using in this guide. Another big problem is the game gives a very high Strength Rating to designs that use missiles (too much IMO). As a result, once these designs are unlocked by researching Missile Theory, fighter bays and planetary defenses will automatically use those designs instead of designs using other weapon types, and often even over player designs that use missiles, or at least ones that I would recommend. I’ll discuss how the Strength Rating works and some of its downsides in its own section towards the end of the guide.
While Fighter Bays can be set to use a specific fighter design, that requires saving a separate ship design every time you want to change the fighters it carries, and then refit your ships to use the new design, which is a real pain. There’s also no option to set planet-based fighter/corvette/frigate defenses to use a specific design.
Overall, missile spam is very powerful, but for someone learning the game, I recommend sticking with Ballistics first. Once you’re relatively comfortable with combat and ship design (at least for small ships), then you can start experimenting with missiles. While the PD Vulcan projectiles aren’t faster than the rockets, the Hyper-Velocity Vulcan projectiles are much faster.
10) From here, there are two research areas of importance: Frigate Construction and Fusion Reactors. For the purposes of this guide, I want to include a design that you can make if you research frigates first. In general, if you’re in a hurry for better defense platforms, go for fusion first, but otherwise I really enjoy what frigates bring to the table.
The Human’s first frigate is called the Gunboat. It excels with 1×3 weapons, and is a much sturdier platform than the Hunter corvette. The Bridge module is unlocked with it.
The Gunship RG ES 1P (RG = Railgun, ES = Energy Shield):

This ship has a Medium Warp Drive and a Combat Thruster
Set them to
Face Forward, Max Range
Although this shield only covers the front half of the ship, it’s still extremely beneficial.
With the HV Vulcan on there, you can change their orders to Short Range during combat to get closer when engaging faster moving targets. Don’t do this if a frigate is on its own. Always make a point of changing them back to max range afterwards.
This design does have enough power to fit a shield amplifier, but it’s much more valuable to research fusion before amplifiers.
I love the long range fire support that these provide.
Despite the armor, don’t wait around to retreat if all of your fighters die. These are vulnerable while retreating since the rear is unprotected. They also turn around slower than what you’ve been accustomed to thus far.
For those unaware, when a ship runs out of ammo, it can look like the ship is making a suicide run. The AI for the Face Forward, Max Range order only looks at the range of working weapons. The idea here is that during combat, as weapons are blown off, it would get closer as necessary, to continue bringing remaining weapons to bear. This happens to also include running out of ammunition.
For this railgun frigate, that means that if there isn’t enough ammo to fire a railgun, but there’s still enough to fire the HV Vulcan, it will automatically close to HV Vulcan range without your telling it to, even though it may only be able to fire one time.
This AI behavior is even worse for ships that use PD Vulcans or 1×1 lasers to shoot down incoming missiles, as it will move in and attempt to attack with those small weapons. All you can do is know that this happens, and when you see it, immediately pause and order the ship to return to base to re-arm.
I would love it if there was a way to tell the AI to ignore certain weapons when determining how close to get. Maybe something like an “Ignore Weapon Range:” drop-down menu with options for 1×1, 1×2, 1×3, or 2×2 weapons and smaller. However, there’s nothing like that.
Moving on, I said we’d add shields to the defense platforms, so here’s the SDP K ES 1:
This is essentially the “Small Defense Platform Mk1a” that comes with the game/mod, with one 1×1 shield generator removed to make room for a Dual Cockpit, I think it’s worth the trade-off.
11) Now that we have shields, power becomes a huge problem. Time to research Fusion Power and incorporate it into our designs.
This is the Lightning HV FS 2:
This fighter uses 1 Small Warp Engine, 1 Small Combat Engine, and 1 regular Small Engine
Set them to Attack Runs
There are a couple of ways to optionally modify this design. It doesn’t really need two ordnance modules. There’s enough power to add a second shield, although it does slow it down some, and increases maintenance. One could also simply be changed to a Structure block for more speed. Later, we can turn one into a shield amplifier.
You can build these Hunter RG ES 2 corvettes now, although the frigate above is superior, primarily since it has a Bridge, which provides better accuracy.


This is a fusion upgrade I made of the Hunter Starchaser Mk1a that’s included with the game/mod. It has over twice the shields, although it is a bit slower.
The Starchasers in general aren’t my favorite, but if you just use them for colony defense, you can replace the two Twin Small Engines with a Medium Engine, or even a Combat Thruster. I found the higher speed makes them much more powerful in combat. Of course, with a Combat Thruster they have no FTL at all.
Fusion allows us to squeeze in a second 2×2 Energy Shield generator on the railgun frigate. This “Gunboat RG ES 2P” has full shield coverage. Keep in mind that if the shields are down when you retreat, it will still be just as vulnerable in the rear as the previous version.
This ship has a Medium Warp Drive and a Combat Thruster
Face Forward, Max Range
12) By this point, I recommend researching Platform Weapons I to get the Orbital Kinetic Cannon Mk1. This will allow building this SDP OK1 ES 2 design (OK1 = Orbital Kinetic 1), which is vastly superior to anything prior:
The Orbital Kinetic Cannons are a special weapon that are only available on small and heavy defense platforms. They are unique in that they have a full 360 degree firing arc. This means that any target will get hit by all three cannons.

For much more detail on defense platforms and other orbital defenses, please see the addendum to this guide on Orbital Defenses.
13) Typically, a lot of freighters have been flying around for a while now. I think it’s time to invest a little time in a nice upgrade for them. Researching Medium Freighters will go a long way.
In older versions, the Large Cargo Hold was incredibly inefficient, so I used to recommend filling the Medium Freighter hull with Medium Cargo Holds. That was changed while I was working on this guide, so I had to throw away the design I was going to show you. Now, Large Cargo Holds are on another level.
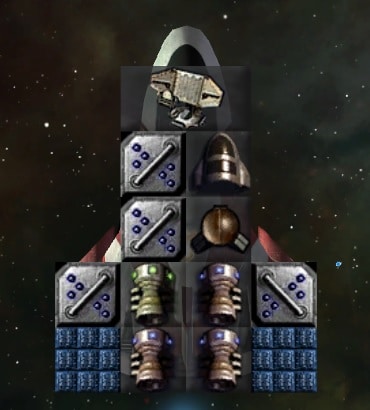
Medium Transport A:
This freighter use a 2×2 Warp Engine and a 2×2 Combat Thruster
The Large Cargo Holds are superior enough that I didn’t find the 1×1 cargo worth the weight anymore. So, I chose to cut down on maintenance and improve speeds instead. The two I did include are just to reach a round number, for human reasons. The sensor is a “nice to have” so freighters provide a bit more vision as they fly around.
14) All right… Before we get started on the big project of researching Cruiser Construction, it’s a good idea to take a look at some of the passive and other beneficial techs, if you haven’t done so before now.
- Researching Shipyards will provide the Advanced Colony Module and Heavy Platforms.
- Load the Small Transport A you created earlier, replace the cargo modules with basic Structure blocks, then add the new Advanced Colony Module. I saved one with the Basic Colony Module as Colony Ship A, and one with the Advanced Colony Module as Colony Ship B.
- Research Subspace Theory and then Reaction Drive under the Physics tab will provide a 20% passive bonus to the speed and maneuverability of all ships.
- Researching Advanced Materials I will provide a passive bonus to the speeds of all ships.
- Researching Shield Efficiency I will provide a passive 10% bonus to the shield HP of all ships.
Colony Modules
There are an assortment of pre-fab modules that you can put on colony ships. If you research Xeno Farming, for example, then you can add a Food Replicator Module to your colony ships. This is not a passive bonus to the colony. What it actually does is instantly build an Aeroponics Farm when the colony ship lands. It takes up a square and costs maintenance, as usual. Thus, these modules mainly just save construction time. This can be useful on planets with zero fertility, but you likely won’t want to build Aeroponics Farms on fertile planets. The Research Module insta-builds a Research Lab. Or, during a war, you may want to send a colony ship with a Missile Silo Module. Just be aware that these are not something you want on every colony ship, but more on a case-by-case basis.
When you do use these modules, it’s best to use one in addition to a Basic or Advanced Colony Module. So load Colony Ship A or B and as an example, add a Food Replicator Module directly below the colony module, so that there are both. Call it Colony Ship FM (for Farming Module), or something like that. Personally, I wouldn’t assign a design like this to the Autocolonize AI.
Note that you can do something like put six Advanced Colony Modules (because they carry more people and cost less than the Basic ones) on a Medium Freighter hull, but it’s probably not worth making a big colony ship, because your freighters will carry people to the colony regardless.
Cruisers
In order to reproduce the Terran Prototype Cruiser, there are several technologies that we need, before getting to Cruiser Construction itself.
15) First, research Subspace Artillery I (under Ballistics). You’ll need Mass Drivers to get to it.
This gives us the Railgun Turret that we’ll need for the cruiser, but it also gives us the Advanced Railgun, so let’s put it to use.
Gunboat ARG ES 2P:
This ship has a Medium Warp Drive and a Combat Thruster
Face Forward, Max Range
The Advanced Railguns use substantially more ordnance, so I was forced to reduce the armor a lot compared with the previous version.
16) Now just research the following:
- Reactive Armor (under Defense)
- Fighter Theory (under Starship Construction) for the Fighter Bays
- Shotguns (under Ballistics)
- Point Defense (under Ballistics)
You don’t need everything on the list to make a cruiser, but this is what’s required for an exact duplicate of the Terran Prototype. For example, it would be easy to leave off the shotguns.
With those researched, along with the other research further up, you should now have everything you need.
17) Having acquired the ability the build duplicates of the Human Prototype, let’s turn our attention to some easy upgrades:
- The armor is a no-brainer. Having a mix of steel and reactive armor still requires researching Reactive Armor, and reactive is a tad lighter than steel, so there’s no reason not to just make it all reactive armor.
- There’s a rather glaring problem with the Phalanx PD on the Terran Prototype: they don’t shoot at fighters! They only fire at missiles. Considering all enemy ships are fighters at the start of the game, that seems like a poor choice to me. We can’t do anything about the prototype, but we can research Defense Guns I to replace them with Flak AA Cannons on new ships.
- Another option is to stay out of the fray so that anti-fighter weapons are hopefully not needed, and instead research Gatling Defense I to replace them with Gatling Turrets. These turrets still only fire at missiles and torpedoes, but they have 180 degree firing arcs and an even higher firing rate.
- We can also research Shield Amplifiers I and make use of our existing fusion reactor technology.
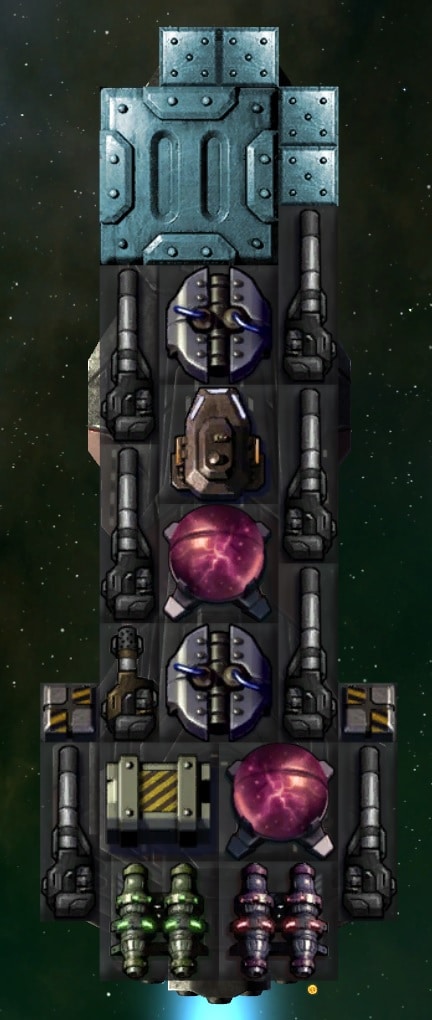
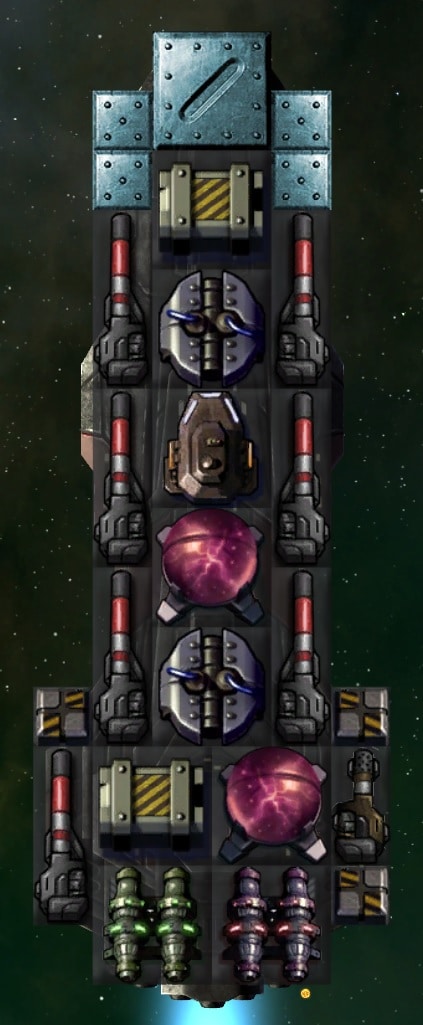
Here’s an example of a Terran Prototype Upgrade I came up with, while trying to stick with the original design:

While watching them in combat, it became clear to me that they really didn’t do much damage. In fact, the two Railgun Turrets are weaker than one of our railgun frigates. Fighters are valuable, of course, but it takes a lot more than four of them to be effective. Anyway, in this next design, I decided to focus more on the Railgun Turrets. With that shift towards on-board weaponry, I replaced the Bridge with a CIC to maximize accuracy. Then I added as many shield amplifiers as I could, resulting in twice the shield HP of the original Terran Prototype.

Lastly, I upgraded this design some more with 2×2 cold fusion reactors. I upgraded the PD to Flak AA and added some more ordnance.

Alternatively, instead of trying to pack in so many shield amplifiers, you could try to upgrade the shield generators to Combat Shields, Deflector Screens, or some mixture.
Ultimately, I decided that if I went any further, I would want to create a new design from scratch.
From here, you might want to make a cruiser with mass drivers. We already researched them on the way to the Railgun Turret. None of them will shoot at fighters, but for now I’d recommend avoiding the ones that list both fighters and corvettes as targets they won’t shoot at.
18) Let’s research Corvette Hulls now so we can cover bombs.
We’re coming towards the end of the guide. I wasn’t going to to cover the larger Seeker corvette, but researching it is required to unlock the 2×2 Tactical Nuclear Bomb. Using planetary bombs is the alternative to using ground troops. There is also a 3×3 Strategic Nuclear Bomb, but they cause permanent damage to the planet, so you should only use those against planets you have absolutely no interest in taking. They also require a larger ship due to their size.
Combined Arms also adds 1×1 size bombs, as well as bombs for drones. These are for striking at enemy capital ships, not planets. They function much like torpedoes, but have really short range.
This Specter TBomb FS 1 is an inexpensive option (TBomb = Tactical Bomb) for bombing planets:
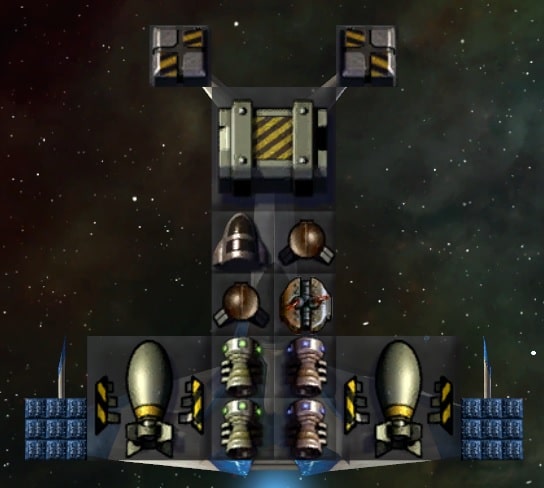
Don’t let the shield fool you into thinking these can take hits.
I didn’t include the PD Vulcans, because having weapons makes it so the bombers can be accidentally selected when drawing a box around combat ships.
You could certainly research these before cruisers, when you have a need for bombs.
Seeker TBomb ES 2P:
This is a much more well-rounded bomber. It has much better shields and some armor. I did add PD for shooting incoming missiles, but you can take them off if you don’t want it to be selectable when drawing a box. Whether it’s worth the expense is up to you, since theoretically, bombers should never see combat. However, that doesn’t always hold up in reality.
It has 1 Twin-Small Engine, 1 Small Combat Thruster, and 3 Small Warp Engines.

Since we’ve researched the Seeker corvette hull now, here are a couple of designs I made. My first idea was to create something similar to the Starchaser. I really wanted a Bridge to make all those HV Vulcans more accurate. For the Humans, at least, my plan was dashed by the fact that the Raider Bay will only launch ships up to 46 squares in size. The Seeker has 50 squares, so it won’t use it. The planetary Corvette Defense Squadron still might use it.
Seeker HV ES 1P:

Adding a pair of PD Vulcans for missile protection would be worthwhile if your enemy is using them.
Set these to Short Range
This has 2 Twin Small Engines, 1 Small Warp Engine, and 1 Small Combat Thruster
By researching Velocity Package I, I was able to incorporate two 1×1 Forward Thrusters:
Now it has 3 Twin Small Engines and two 1×1 Forward Thrusters.
I don’t know that it’s worth researching Velocity Package I for this, but I figured I’d list it as an example. Keep in mind that the various types of forward thrusters seem to add a lot of maintenance.
Strength Rating
Every design in the game is given a Strength Rating, which is shown on the list of ships you can build, and also when selecting a ship to load from within the Shipyard screen. This is the game’s attempt to rank how good one design is compared with another. It’s semi-useful at doing that when comparing ships that use similar components.
Here’s what I’ve been able to ascertain:
- It seems to be most heavily influenced by raw DPS. Accuracy, projectile speed, etc. does not appear to be considered at all.
- This includes the damage output of PD weapons that will never be used offensively.
- Hit Points, including armor, shields, and all other modules
- Speed is completely ignored, and this is where you’ll often see a more effective design get a lower rating. Careful design considerations that reduce mass result in a lower rating, even though the design is actually better.
- No consideration is given to construction and maintenance costs.
I find that this the rating fluctuates wildly between different weapon types. It heavily favors designs that are packed with as many weapons as possible. If it was purely used as something the player could reference for themselves, it wouldn’t really matter. The main problem I find is that it’s used by the game to decide what designs to spawn from planets and hangars (fighter bays, etc.).
When I say “spawn”, I mean spawned automatically by the defenses that then de-spawn when the battle is over, not persistent ships that are built.
There are a number of fighter and corvette designs that come with the game. I would love to have a global setting to tell the game not to spawn any non-player designs from planets or carriers. That would help a lot. While you can tell the game not to display non-player designs, it doesn’t affect the game’s spawn choices.
Secondly, it would be great to have a global setting, similar to the Automation menu, where we could choose a specific design colony defenses will use for fighter defense squadrons, corvette defense squadrons, and frigate defense squadrons
Conclusion
I’m going to bring this guide to a close here. Some interesting techs at this point (in no particular order):
- Stronger Armor
- More hulls in general
- Lots of stuff under the Colonization tree:
- Researching Imperial Customs and building a Planetary Customs Station on well populated worlds, such as the homeworld, will increase income.
- Researching System Networks and building a System Research Network Uplink on well populated worlds, such as the homeworld, will increase research and income.
- Researching Mercantism will cause freighters to generate some income.
- Researching Nanoweave Metallurgy I, under Upgrades, will provide a passive 10% bonus to the HP of all ship modules, including armor.
- Researching Ace Training, under Starship Construction, is useful for anyone using a lot of fighters, but I find it especially useful when using fighters on carriers and/or for colony defense.
- You might want to take another look at Biospheres at this point, now that your colonies have grown. Check what I wrote under the Colonization section near the start of the guide if you need a refresher. They cost a lot of maintenance, so you have to use them selectively.
Hopefully this guide gave you a good idea of military progression, and in subsequent games you can experiment some more. Maybe you’ll want to research Xeno Farming earlier to get the new colony module that adds 0.5 food production on each new colony. There are certainly lots of planetary buildings to check out.
It’s rather out of date at this point, but you might find some useful information on energy weapons in my last StarDrive guide, on the Opteris. I also talk a lot about Drones. Ignore anything about shields in it, as the shields have been heavily revised.
Here are a few designs that didn’t fit into the guide:
This is a Medium Freighter hull with Container Decks instead of Large Cargo Containers. I found the Large Freighter way too slow, but I was pretty happy with this design. You could add a sensor if you like.

Some of you may find this helpful. This is an ordnance transport. It carries a bunch of ordnance and it has an Ordnance Shuttle to transfer it to nearby ships. The shuttle can carry 100 Ordnance at a time. I didn’t fully fill this ship because I wanted it to be somewhat mobile.
You can make more advanced versions using 3×3 containers. This hull can only have one Ordnance Shuttle. As your fleet starts needing more ordnance, you’ll probably want to use a non-freighter hull and use two shuttles.
Personally, I use ships like these to provide ordnance during long sieges. I’ve got myself in the habit of always ordering my fleet to return to a planet between battles, so I don’t really need them for that.
Another support ship idea is to make one with repair drones.
Specter HV FSa 2P:
This one requires researching Shield Amplifiers I.
Face Forward, Short Range
The PD Vulcans are there mainly to tell it to get in closer than it would without them. I find this design far superior to the Specter Starstream Mk1a that comes with the game/mod.
Lightning ProtoB FS 2:
Face Forward, Max Range
Low DPS, but the beams have no travel time, so they can be more effective against enemies that are backing up. I haven’t tested it in combat with this version.
Lightning Scout A:
Avoid Enemies
Not necessary, but this speed demon will scout faster. No shield. Using two Twin Small Engines is an even faster option, but costs more maintenance.
Shuttle R 1P:
This rocket shuttle can work well when researching Missile Theory near the start of a game.

The rockets suck against Remnants, but they can be good against AI empires.
Lightning R FS 2:

While working on the Seeker HV ES 1P above, I saw the Seeker Gallentstride Mk1a that comes with the mod, and I really liked it. It requites Missile Theory I because it has a single 1×1 Rocket Launcher. I wanted to put a Bridge on it, and I ended up with this. I just called it the Seeker Gallentstrike Mk1b:
Mainly more accuracy and repair from the Bridge. A second Rocket Launcher.

Heavy Gunboat AT54 ES 2P:

Slow, but good firepower.
Set them to Long Range
Small Defense Platform “SDP OK1 DS1 2”:
The 1×1 deflectors aren’t as good, so it may be better to replace them with 1×1 Small Craft Battle Shields, when available. Keep the 2×2 Deflector Screen.
More information is available in the addendum on orbital defenses. Check it out!
Now, go and prepare… The galaxy can be yours. Make sure you have the ships you need to take it.